Sunday, June 29, 2014

OWIN and Katana, a first look

Since I do quite a lot of web development, I thought it a good idea to take a first look at OWIN and Katana, get a feel of what they both are about and how they can be used in a project. They are both part of a new web hosting model, where OWIN is the specification of this model and Katana is an actual implementation of this specification. In this post I will give you an overview of both and show you how you can build the basis for a web application using the Katana project.

But, let me first give you a small intro on both.

In .NET, when you build a web application, what you typically do, is use ASP .NET (either webforms or MVC) and host your application in IIS. This framework has been around for quite some time, and it has really become big. For some applications, this model can be bloated, since it runs a lot of things you don't really need in your application.

What they wanted to aim for at Microsoft with OWIN and Katana, is build a basis for a framework, that is really light weight, with just the essential things for a web application in it. And if you need extra's you just pull them in as you need them. More or less similar to what you would do to a nodejs server application. Very light weight, but also very powerful.

Along came OWIN, which is a specification for how you can build a web server that can host .NET code. It sits between a hosting environment, which in this case can be either IIS or something else, like a Windows Service, or a simple Console Application, and your actual application code. Any additional middleware, like authentication, can use the OWIN abstraction to be plugged into your application.

So, what does OWIN actually define or specify? Well, the most important part of the OWIN specification is the application delegate, which looks like this:

using AppFunc = Func<
        IDictionary, // Environment
        Task>; // Done

The application delegate has an argument of type IDictionary, which is called the environment dictionary. This dictionary contains information about one single request, its response and any relevant server state. In it, you will be able to find keys like owin.RequestMethod, which can have a value like GET or POST, or owin.RequestPath, which contains the value of the actual called URI. An overview of possible values can be found in the OWIN specification document

The second argument of the application delegate, the actual return type, is a Task, that will be returned once it has finished processing. You will see the usage of this Task once I start building up some more practical examples. What you will notice, with this task, is that the OWIN architecture is asynchronous by design.

The application delegate is a way of hooking into an OWIN server. Meaning that if you want to hook into an OWIN environment, you will need to have a method that complies to the signature of this application delegate.

Now, where OWIN is a specification, Katana is Microsoft's implementation of this specification. In Katana you can find a couple of OWIN hosts either for IIS, or for self-hosting. You will also find a couple of classes that help you with talking to OWIN, so you don't need to, for instance, take values directly from the environment dictionary. And you will also be able to find a couple of middleware components, like authentication, ...

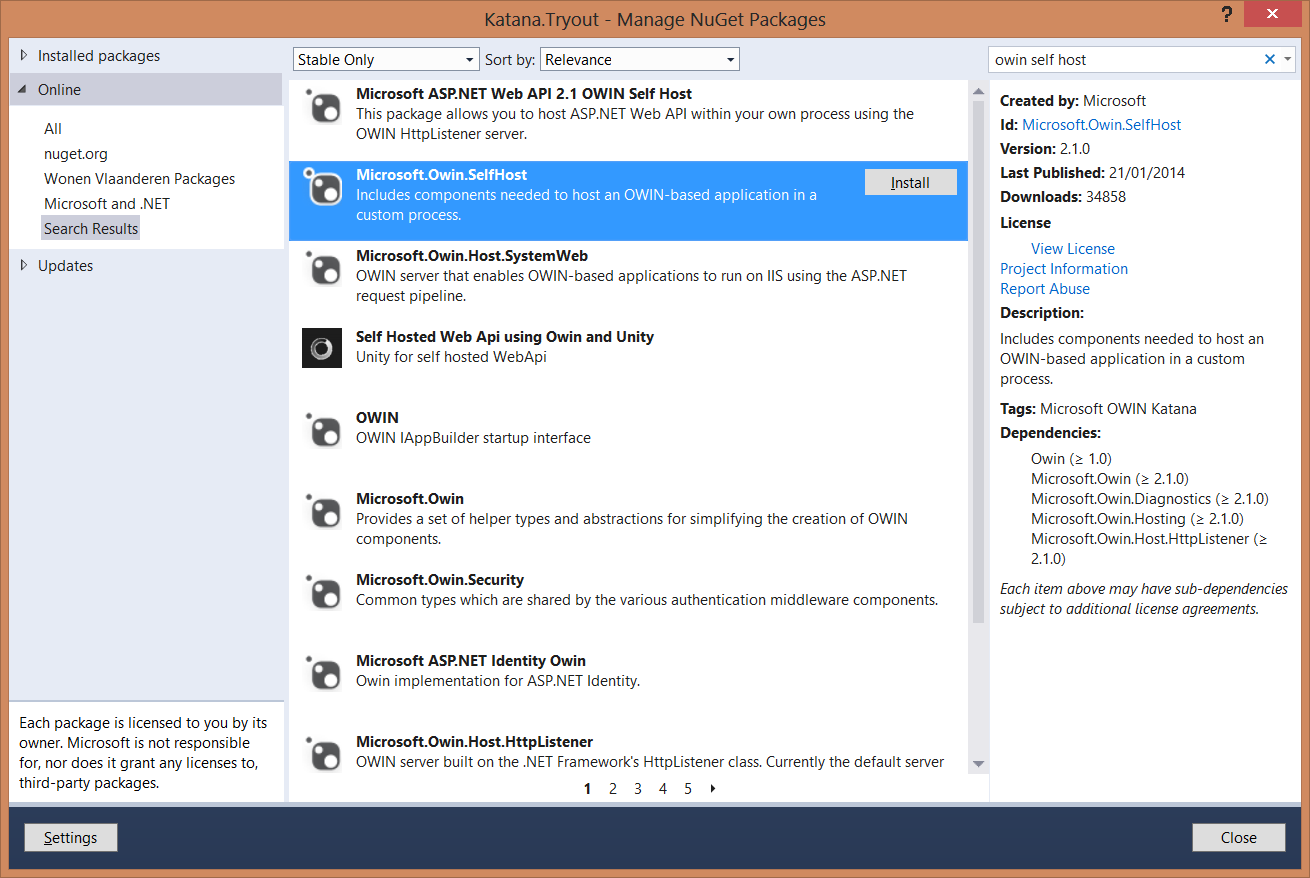
So, let's build a small application with Katana. For this we start of with an empty console application, which we will use as a host for our application. In this we will install the OWIN self host nuget package.


Once we have this, we can start hosting an application. For this we use the WebApp class which represents the self hosting OWIN server and tell it which url it should listen on. We also give it a configuration.

The configuration class is based on convention, it needs a Configuration method that takes an IAppBuilder as an argument.


Now we can start configuring our OWIN host. First thing we will do is a very simple host, which prints out some information of the response that came in, and which returns a string that says Hello OWIN and Katana. For this we use the Run method on the IAppBuilder. This will get a context, which gives us access to the environment variable.

As you can see in the code example, the interface is async by default. The Request and Response properties give us easy access to the data in the environment variable.

When we run this example, we can go to the localhost:4321 uri. It will give us the following response:


And in our Console, we can see the method and URI printed out:


So, that's a really simple example. We can also add some preprocessing or postprocessing to our request. For this you utilize app.Use. This will take 2 arguments, the context, but also a reference to the next middleware delegate in the chain. Whatever you want to do as preprocessing you put before your call to the next delegate. Whatever you want as postprocessing, you put after the call to the next delegate.

This gives us the following output:


Another way of programming this, is with separate classes instead off with delegates. The same example than looks like this:


You create a class with an Invoke method. This method will get the environment dictionary directly. If you want to use the OwinContext instead, you can new it up. Your next delegate this time will not be passed as an argument to the Invoke function, but will be passed as a constructor argument.

With all this you can already do some nice stuff. Beware though, since the API will still be subject to changes. For people wanting to try this on non Windows machines, there's also a Nowin nuget package, that also runs on Mono. Hope this entises you to try some of this stuff out.


Sunday, February 9, 2014

Extending Durandal

Summary: combining Durandal and ASP .Net MVC, getting the best of both worlds


Experience has taught me that, when doing web projects, JavaScript is one of the technologies you will have to learn to live with. It will always be present and it will always bug you (literally). And in each project, you will have devs at your disposal who are better, or worse at writing JavaScript code. It's just a fact that, once you start writing a whole bunch of JavaScript, it can get quite messy, very quickly. 

In my recent project setup, I wanted to be able to avoid such a mess, by providing well structured JavaScript code from the beginning. But, without having to sacrifice the comfortable environment the ASP .Net MVC framework gives to my devs.

For this, I looked into a couple of JavaScript frameworks. Without treading into details here, the framework that suited my situation best was Durandal. It's not that hard to learn, it makes extensive use of RequireJS (which was already known by a lot of my developers) and it uses knockout for its bindings, which, for people coming from for instance XAML, looks quite familiar. 

For people unfamiliar to Durandal, knockout or RequireJS, you can find very good info for getting started with all three of them. 

Now, the problem with my recent project, was the combination of the good parts of ASP .Net MVC and the good parts of Durandal. For instance, what I like about ASP .Net MVC is the fact I can use statically typed helpers in my HTML. They help my devs a lot at being consistent and at keeping the error rate low(er). Kinda like what this stackoverflow question poses. So I started thinking of an easy way to accomplish this. 

My application itself will consist of little mini-SPA's. Meaning that for each part of the application, for instance the detail of a customer, or the overview of payments, ... we will make a Single Page Application (SPA). The starting point of each of these little mini-SPA's will be a .cshtml view which will get returned by an action on a controller. This .cshtml view will contain a div for the applicationHost (this is standard Durandal) and some code to start up an SPA on this page. 


As you can see, this is standard Durandal code. The only thing I did was make my own little module that sets up an SPA for a certain viewmodel, so you don't have to repeat that code over and over again in the application.

Now, what durandal does once you set up an SPA for barcode/shell, is that it starts looking for barcode/shell.js (your viewmodel) and barcode/shell.html (your view) and it links these two together. But the thing is, I actually want to set up a view in which I can use the MVC helpers. That's not possible in an HTML file. 

So, I started digging in the Durandal source code, looking for the part where the viewmodel and the view get linked together. Its in Durandals viewLocator.js file. In here, I added some extra script, giving you the ability to add an extra div (I called it applicationContent, out of convenience) in your original .cshtml file (lines 15 through 18). 


Once you start up you SPA Durandal will now look for the presence of this div and if it can find one, it will put its contents in the applicationHost div. You can now use this abbility in your .cshtml file:


As you can see I can now use things like Html.BeginForm or our Translations resource in the cshtml file. It's all placed in a div called applicationContent. Once my SPA starts up, it will place this content in the applicationHost. You also have the ability to use knockout bindings inside your applicationContent. You can see I did this for the submit binding on the form and for the pdf_url in the iframe. 

If you want to look at this extension of Durandal: I forked the project with my little addition.


Saturday, January 25, 2014

Building a cross platform solution for Windows Phone and Windows 8. Part VI: Behaviors for coping with orientation changes

Previous parts in this series:

Part 0: Intro
Part I: Quick sharing of code
Part II: The class library approach
Part III: We need a pattern
Part IV: Mocking out the differences
Part V: Event to command
Part VI: Behaviors for coping with orientation changes
Part VII: Tombstoning

In the last post we looked at an EventToCommand implementation to easily databind our events to commands, even when we don't have a Command property on a control.

In this post, I will run you through another trick, to ease the development of your views.

One of the behaviors you will probably want in your application is the ability to react to orientation changes. You can easily do this by creating an event handler for the OrientationChanged event in the code behind of your page. You will have to do this in every page you want to be able to react to orientation changes. Resulting in copies of the same piece of code all over the place.

But there is actually a more elegant way of dealing with this, and it is based on behaviors. What you can do is write a specific behavior that does nothing more than attach an event handler to the OrientationChanged event of the associated page. Based on the name of the new orientation, you can now load a specific state of you VisualStateManager.


Of course, in XAML, you now have to create the necessary VisualStateGroups for the specific orientations.


The only thing missing still is a small extra piece of XAML to make use of the OrientationChangedBehavior.


That's it, small and simple little trick. In the next part we'll look at the troubles you can have when your application needs to be tombstoned.

Other parts in this series:

Part 0: Intro
Part I: Quick sharing of code
Part II: The class library approach
Part III: We need a pattern
Part IV: Mocking out the differences
Part V: Event to command
Part VI: Behaviors for coping with orientation changes
Part VII: Tombstoning

Monday, December 23, 2013

Building a cross platform solution for Windows Phone and Windows 8. Part V: Binding events to commands

In the previous part of this series, we did quite a lot. We mocked out any application differences in our ViewModels, we introduced dependency injection and we created base classes for our platform specific pages.

This part will be less complicated, but will again contain a very necessary part if you want to end up with a reusable framework for your Windows Phone and Windows 8 applications. Up until now we have created Views that we can databind to our ViewModels. For this our ViewModels contain either data properties or command properties. It is with this last kind of properties you might have some issues in databinding scenarios. And this doesn't only go for cross platform applications, you will have this issue every time you want to take the MVVM approach.

The thing with command properties is that, out of the box, they are only databindable to, well, Commands. So, a button for instance, poses no problem, since it has a Command property. But what if, for instance, you wish to trigger a command based on a Tap event. This will not be possible by default. But, you can provide some extra pipe-lining to make this possible nonetheless.

What we'll do to get around this, is write our own TriggerAction. A TriggerAction describes an action to perform by a trigger. The good thing is that you can attach a TriggerAction to an EventTrigger. An EventTrigger will then execute your TriggerAction based on a certain event.

To get all this working, first thing you will have to do is add a reference to the Systems.Windows.Interactivity namespace. On Windows Phone you can find this reference under Assembly - Extensions (I had to look for it too). For Windows 8 you will not find this assembly in your references, but you can use this nuget package.

Once you've done this, you will find you can add an EventTrigger for any event you would like. In the following example I have added one for the Tap event on a Border control.


Next step, now that we have our EventTrigger, is write a TriggerAction that translates our event to a command. This is actually not that hard. You notice in the code sample above I use a framework:EventToCommand type, which I provided myself. This is my TriggerAction which has one property, Command. It looks like this.


This class inherits from a TriggerAction for a FrameworkElement (this is just the base class for all possible controls). The first line registers my Command property as a DependencyProperty. This is needed so you can assign values to this property from within your XAML. That is also why, in the actual property, you see the use of GetValue and SetValue - that is just because we are using a DependencyProperty.

The Invoke method in my EventToCommand is more important. It gets executed each time the associated event gets fired. What it does is, it looks wether the Command can be executed and when it does, it executes the Command.

With this, you can more or less databind anything in your views. More or less, because if you want to databind your application bar in a Windows Phone application, you will have to go through some extra effort, which involves a lot more code. You can get a pointer to what needs to be done here.

Next part, I will show you another little trick to easily react to orientation changes.

Other parts in this series:

Part 0: Intro
Part I: Quick sharing of code
Part II: The class library approach
Part III: We need a pattern
Part IV: Mocking out the differences
Part V: Event to command
Part VI: Behaviors for coping with orientation changes
Part VII: Tombstoning

Sunday, December 15, 2013

Building a cross platform solution for Windows Phone and Windows 8. Part IV: Mocking out the differences

Other parts in this series:

Part 0: Intro
Part I: Quick sharing of code
Part II: The class library approach
Part III: We need a pattern
Part IV: Mocking out the differences
Part V: Event to command
Part VI: Behaviors for coping with orientation changes
Part VII: Tombstoning

In the previous part I talked about the MVVM pattern as a great way to share logic in your application. Your ViewModel (and Model) code can be placed in a portable class library, thus making it reusable. But, since it is not possible to put any platform specific code in your PCL, you cannot directly use platform specific services from within a ViewModel (this would make your PCL unsharable between platforms). This poses some challenges, but these can quite easily be overcome. This part in our series will be the most extensive thus far, and will contain the most advanced concepts, like inversion of control, dependency injection, and reflection. But bear with me, it will all be worth it in the end!

Let's first look at one of these platform specific behaviors: Windows Phone and Windows 8 both allow you to navigate from one page to another. The way they do this, however, is different between the two platforms. They both have a Navigate method for this, but the method exists on two different types, and also, the actual parameterlist of this method is different on each platform. You will need to find a solution to get a comparable way of navigating between pages on both platforms. You can do this by wrapping the platform specific functionality with an interface. Your ViewModels can then talk to this interface instead of talking directly to the actual navigation service of each platform.

I have for instance a MainViewModel which acts as start page for my application. From this MainViewModel you can navigate to other pages in the application. For this, the MainViewModel gets a reference to a INavigate interface through its constructor (this is my own INavigate interface, and not the one you can find in the Windows Store or Windows Phone API). Since I will be navigating in my ViewModels and not in my Views, I decided that when I navigate to another page, this is actually the same as navigating to another ViewModel. Also, I want to be able, when I navigate, to send along an additional parameter, which contains extra data for the ViewModel I navigate to.


In the above code you can see it is quite easy to navigate to another ViewModel, and send along extra data (navigate to the SudokuBoardViewModel with a specific game level). But you can also choose not to use this extra data (navigate to the SudokuRulesViewModel).

The interface itself has one extra method for navigating back.


What you will still have to do now is write platform specific implementations of the INavigate service for each platform you want to support. The good thing is, you will need to write this kind of implementations only once. After your first app, you can reuse this effort to a next application (and I will also make sure my own little API will become available on github in the next couple of weeks).


1. Navigating in a Windows Store application


Let's first look at the WindowsStoreNavigator, since this is the easiest to understand. To navigate from one page to the next, you need to make use of your Window.Current.Content property (or rootframe). In a clean Windows Store project you get a reference to this in your OnLaunched event (I set up the entire framework from the OnLaunched handler in the app.xaml.cs file). Next, we will also need some means of associating the ViewModel we wish to navigate to, with a certain View, since navigating in Windows Store applications is done to views and not to viewmodels. For this I will utilize a viewlocator (IKnowWhereYourViewIs). This viewlocator is nothing more than a dictionary that associates views to viewmodels. This way I don't need to code the binding between view and viewmodel directly in the view or in the viewmodel.


As you can see, I ask the viewlocator for the view that is associated with the viewmodel I wish to navigate to. Next I tell the rootframe to actually navigate to this view. The second parameter in the second line of the NavigateTo method instantiates my viewmodel. The inversion of control container has been set up with a list of all my viewmodels. For this I utilized TinyIoc, but you can use any wich IoC you like. The main advantage using and IoC container will be that any dependencies your viewmodel uses, will get injected by the IoC, as long as you registered them at startup.

Navigating with the extra data is a bit more complex. I created a IHandle interface which indicates wether a ViewModel can handle a certain message. If it does, it implements the IHandle interface. Before navigating to the view, I first let the ViewModel handle the actual request.


One more thing missing after navigating to a certain view, is the actual databinding between View and ViewModel. For this I created an extra base class for each View. In the OnNavigatedTo handler, we will bind the NavigationEventArgs, which in our case is our ViewModel, to the Views' DataContext.


And that's it. This allows us to navigate from one ViewModel to another, while sending along data. Also aer we now able to actually databind our ViewModel to the actual View.


2. Navigating in a Windows Phone application


Now that we can navigate in a Windows Store application, let's do the same thing for Windows Phone. As you will see, the API for navigating in Windows Phone is different from the one Windows Store applications use. In Windows Phone you navigate based on a Uri. Also, we will not be able to send along our ViewModel and request as easily. In this case, we will serialize everything before we navigate. Ie. we will serialize our ViewModel type, the actual request and the request type.


Again, we will use a MvvmPage base class, which all our views can inherit from. In its NavigatedTo event handler we will now have to (re)create our ViewModel and request. I pulled out this code to another class which implements ICreateViewModels. Since views cannot use dependency injection, I wrapped the IoC in a singleton, which can give me my viewmodelcreator.


The ViewModelCreator then uses a deserializer and some reflection to recreate the viewmodel and to make it handle the actual request.


The above code is actually the most complex part of the entire framework. An, as said, code like this, you will only have to provide once, after that your can reuse it for your next applications.

Once you got thi plumbing in place, you can navigate between ViewModels in a way that is reusable on Windows Store and Windows Phone applications. It wil make it easier to put your logic code in a shared library and to easily make changes to it that will get reflected on each platform.

Hang on for the next part, where I will talk about some extra helper classes to make MVVM work better for you.


Other parts in this series:

Part 0: Intro
Part I: Quick sharing of code
Part II: The class library approach
Part III: We need a pattern
Part IV: Mocking out the differences
Part V: Event to command
Part VI: Behaviors for coping with orientation changes
Part VII: Tombstoning

Sunday, December 8, 2013

Building a cross platform solution for Windows Phone and Windows 8. Part III: We need a pattern.

Other parts in this series:

Part 0: Intro
Part I: Quick sharing of code
Part II: The class library approach
Part III: We need a pattern
Part IV: Mocking out the differences
Part V: Event to command
Part VI: Behaviors for coping with orientation changes
Part VII: Tombstoning

In the previous part I talked about portable class libraries and mentioned the need for a pattern in our code. This pattern will be the Model - View - ViewModel pattern, or MVVM for short. It divides the pieces of your application in more sensible parts and allows you to better define the responsibilities of each individual part. The View for instance will be responsible for nothing more than UI related code. This will be your XAML file. When using MVVM, I try to define my entire user interface in the XAML of my application. I hardly ever put anything in the code behind (except maybe for some UI specific code), all application logic will go someplace else.

The Model in this pattern can be either data you need or services you will be using. These will contain quite some logic and we can write them in such a way that they are unit testable.


The ViewModel will sit between the View and the Model and its responsibility will be to shape the data of the Model in a way that is specific for a certain View. As with the Model, it will also be unit testable.

The ViewModel will contain all the properties for the View to databind to. For these properties you can choose to fire the PropertyChanged event - and thus your ViewModel will implement INotifyPropertyChanged.


The above piece of code shows two properties of one of my viewmodels. The first one is for a collection of items. The second one is for a simple property. Both properties fire the PropertyChanged event. As you can see this is done through a lambda expression. I prefer putting this kind of PropertyChanged event wrapping in a base class for my viewmodels and providing the easier lambda syntax. This provides me with compile time checking (and less runtime errors when I make typos). The way to do this, is shown in the following code example.


Next to simple data properties, your ViewModel can also contain command properties. The View can also databind to these (for instance from the Command property of a Button). A command property will ascertain something gets executed in the ViewModel or in the Model.


As you can see, I use a RelayCommand class, which again makes the creation of command properties easier. The RelayCommand class will implement the ICommand interface and will provide an API by which you can createICommands based on lambdas or delegates. The RelayCommand class looks like this:


When creating commands for your view to databind to, you can also use the CanExecute property, to indicate when a command can be fired, and thus, when the button you databind do should be enabled. This is quite a neat way to automatically enable or disable buttons on your view.


Databinding to all this, is now quite easy from the view.


Using this pattern we get a better separation of concerns in our application. The only thing to watch out for is the danger of your ViewModels getting too big. Keep in mind that the ViewModels' purpose is to shape the data of the Model specifically for a certain View. This means that most of the logic will be the responsibility of the Model, and not necessarily of the ViewModel.

The advantage will be that you can put both Model and ViewModel in your portable class library, giving you the ability to reuse all of the logic between different platforms. And since both Model and ViewModel can be unit tested, you gain a great advantage.


But we will still have to add some extra techniques if we want the ViewModel to be able to use platform specific services. For this we will introduce dependency inversion in the next part of this series.

Other parts in this series:

Part 0: Intro
Part I: Quick sharing of code
Part II: The class library approach
Part III: We need a pattern
Part IV: Mocking out the differences
Part V: Event to command
Part VI: Behaviors for coping with orientation changes
Part VII: Tombstoning

Tuesday, December 3, 2013

Building a cross platform solution for Windows Phone and Windows 8. Part II: The class library approach

Previous parts in this series:

Part 0: Intro

Part I: Quick sharing of code

In the previous part of this series, you learned about linked files. While these are a good technique for quickly sharing pieces of code of your application, I prefer using a class library for shared functionality. The problem is however, you cannot use a regular class library in Windows Phone or Windows 8. What you can use though is a portable class library. This is a special kind of class library that makes it possible for you to target multiple platforms.


What you will get when using a portable class library is the greatest common divisor between platforms of functionalities you will be able to use.

For creating one, you can chose 'Portable Class Library' as a project template.


When creating the PCL you will get an additional pop up asking you for the platforms you wish to target with your portable class library.


In our case choosing Windows Phone and Windows 8 will suffice. For Windows Phone you might also choose to target at least version 7.5 or 8. The higher the version you choose the more possibilities you will have in your portable class library. This is due to the fact that Windows Phone 7 doesn't support the entire .Net framework, so you will bump into some coding restrictions when specifying Windows Phone 7. I myself, most of the time, choose at least version 7.5, just for convenience and since I assume most Windows Phone 7 users will have by now upgraded to this free version.

So, now we have a place to put all of our shared code. But, what will this shared code be? It's not like we can put the code behind pages of the XAML files in this class library. So we will have to take the not so conventional path and make use of an additional pattern which will make it possible for us to put the business logic of our application in the shared class library. This pattern will be the MVVM pattern, since it can very easily be used in databinding scenarios and since it gives us a reactive user interface with INotifyPropertyChanged. This will be explained in the next part of this series.

You can find additional information on Portable Class Libraries here.


Other parts in this series:

Part 0: Intro
Part I: Quick sharing of code
Part II: The class library approach
Part III: We need a pattern
Part IV: Mocking out the differences
Part V: Event to command
Part VI: Behaviors for coping with orientation changes
Part VII: Tombstoning

Monday, December 2, 2013

Building a cross platform solution for Windows Phone and Windows 8. Part I: Quick sharing of code

The intro to this series you can find here.

If you want to be able to quickly share things between a Windows Phone and Windows 8 application, you can always use the technique of linked files. Linked files are existing files you add to a project, for instance a file that already exists in your Windows 8 project and which you want to add to your Windows Phone project. But, instead of adding this existing file in the normal way, you add it as link. This is an additional option you can choose in the 'add existing item' dialog box.


This will give you this same file in your other project, but not as a copy. Meaning that if you make a change to the file in one of the two projects, you will see this change reflected in the other project as well.

You can use this technique for reusing code files or for reusing XAML files. But, as stated in the intro of this series, with XAML files you will have to:
  • remove any platform specific namespaces.
  • only reuse small pieces of XAML (you will for instance see that for pages the start tag in your XAML is different, for Windows Phone this is a PhoneApplicationPage, for Windows 8 this is a Page tag).
If you use the technique of linked files for sharing code files, you can additionally use partial classes to cope with any platform differences. The shared code you can put in a partial class that you add as a linked file for the other platform. You then add another partial class file (with the same class name of course) in each project with the platform specific stuff. If you don't like partial classes that much, you can also choose to use inheritance for this. You will add your base class as link and create child classes with platform specific code in them.

Another technique for coping with platform differences when using linked files is the use of preprocessor directives. These look like if-statements you put in between your code. They will contain the lines that are specific for a certain platform.

  public static void Initialize() 
  { 
#if WINDOWS_PHONE
      if (UIDispatcher != null) 
#else 
#if NETFX_CORE 
      if (UIDispatcher != null) 
#else 
      if (UIDispatcher != null && UIDispatcher.Thread.IsAlive) 
#endif 
#endif 
      { 
          return; 
      } 
#if NETFX_CORE 
      UIDispatcher = Window.Current.Dispatcher; 
#else 
#if WINDOWS_PHONE
      UIDispatcher = Deployment.Current.Dispatcher; 
#else 
      UIDispatcher = Dispatcher.CurrentDispatcher; 
#endif 
#endif 
  }

(The above code is courtesy of MVVMLight, a very good starter framework for doing MVVM).

As you can see in the above code snippet, there are some specific if-statements, called preprocessor directives, added. The ones for NETFX_CORE indicate to the compiler the lines of code that need to be compiled for Windows 8. The WINDOWS_PHONE ones will be compiled for Windows Phone. This can help you add platform specific code as well.

With the technique of linked files you can get quite some reuse of code between Windows Phone and Windows 8 applications. You can also use partial classes, inheritance or preprocessor directives to add platform specific code. But I do want to point out the following flaws in using this technique (and this is why I don't prefer using it myself):
  • Each technique (partial classes, inheritance, preprocessor directives) makes it hard to unit test your code, since it directly contains platform specific code.
  • Preprocessor directives, especially when used a lot, make it harder for you to read and understand your code (I've had projects going from a couple of preprocessor directives in one file to multiple and thus even more unreadable code).
In the following parts of this series, I will show you another technique for adding platform specific code, that will, at the same time, keep your code cleaner, more readable, more reusable and more maintainable (now, wouldn't that be nice).


Other parts in this series:

Part 0: Intro
Part I: Quick sharing of code
Part II: The class library approach
Part III: We need a pattern
Part IV: Mocking out the differences
Part V: Event to command
Part VI: Behaviors for coping with orientation changes
Part VII: Tombstoning

Sunday, December 1, 2013

Building a cross platform solution for Windows Phone and Windows 8

This is Part 0 of a multi-part series blog post. In this series I will give you a walk through of how you can build a cross platform solution that targets both Windows Phone and Windows 8. I will try and give you pointers on how to keep your code as reusable and clean as possible. We will especially look at a couple of patterns and good practices for this. And in the mean time you will get to know some more advanced MVVM.

But before we start, what are actually the problems you face when trying to target two platforms like Windows Phone and Windows 8? They are both XAML based, right, so this shouldn't be too big of a problem. Well, although both platforms are on the path of convergence, meaning moving towards each other, there are still quite some differences you need to take into account.

One of those differences is the actual XAML you can use on each platform. Although the controls on each platform might be the same, they often live in different namespaces. There are also controls that are specific to either Windows Phone - like the PivotControl - or to Windows 8 - like the FlipView control.


This makes sharing your XAML less obvious.

I wouldn't recommend sharing too much of your XAML between Windows Phone and Windows 8 applications Anyway. You will see that you will mostly try and build a UX experience that is specific for the platform at hand. Keep in mind as well that both platforms support quite different form factors. The things that will be most easy to share will be small pieces of XAML - like things you put into user controls or small data templates.

Apart from differences in your XAML you will also see differences in the actual API's you can use from Windows Phone and Windows 8. Both for instance provide you with an API for navigating between pages in your application, but if you look at the actual Navigate call for each platform, you will find that the call takes different parameters.


This makes it less obvious to share code between the two platforms. However, later in this series, I will show you a technique that will give you quite some advantages for reusing for instance your navigation code.

We just have to use a couple of techniques to get around these differences. I will try and give you some pointers in this series. Mainly I want you to get to know some techniques that will allow you to reuse as much of your business logic (the heart of your application) as possible while targetting multiple platforms.

In this series you will find the following parts (and hopefully, if time permits, more to come):

Part 0: Intro
Part I: Quick sharing of code
Part II: The class library approach
Part III: We need a pattern
Part IV: Mocking out the differences
Part V: Event to command
Part VI: Behaviors for coping with orientation changes
Part VII: Tombstoning

I also recently did a talk on this topic at the 2013 MCT Summit, which got filmed. I hope I can soon add the video of it to this series, so you have some extra reference material there. Other extra reference material to come:

  • A list of useful links on cross platform development
  • The slides of my 2013 MCT Summit talk
  • The start of a little framework you can use to build applications that target Windows Phone and Windows 8 (work in progress for now)
So, hope to see you soon for the first part in this series! I'll keep you posted!


Friday, August 16, 2013

Automated JavaScript tasks with Grunt

I am currently working on a JavaScript only project and was looking for a way to automate some of the JavaScript processes. I was primarily looking for a way to get my tests automated, more or less the same as when you check-in code, your tests get automatically run.

For this I chose grunt, which can easily execute different tasks, not only can it automate your test runs, but it can also automate other JavaScript tasks, like minifying your files, running them through jslint, ... You can find a complete list on the grunt site.

The project I am working on is a Windows 8 application (not XAML this time, but JavaScript, HTML5, ...). So I am working in a .Net environment with a solution and a couple of projects.

Grunt Basics


To get started with grunt, first thing you will need to do is install node. All tasks you will be running in grunt will need to be installed using nodes packaging system npm (you can compare npm to the gem install process in ruby or nuget in .Net). After installing node, you can install grunt using npm. Once you've done this, you can start creating a grunt file in your web projects. A grunt file contains different tasks that need to be run, like uglify, jslint, minify, ...). You can find all info on getting started here.

Running jasmine tests with grunt


Now, the thing I wanted to be able to do, was run my jasmine tests though grunt. For this I have some simple jasmine tests set up. I could already run these through the jasmine browser runner. I also tried out a setup that ran my jasmine tests browserless through phantomjs and with the help of the build in Resharper runner, which works great. 

For running these same tests with the help of grunt I needed to install a couple of extra grunt tasks through npm: contrib-jasmine and contrib-connect. The first one, obviously is needed to run your jasmine tests. The second one, connect, can be used to set up a browserless environment for grunt, so it won't start up a browser session with every run of your grunt file. Connect can also be replaced by node itself.

The grunt file itself contains tasks for connect and jasmine:

module.exports = function (grunt) {

    // Project configuration.
    grunt.initConfig({
        pkg: grunt.file.readJSON('package.json'),
        jasmine: {
            src: '<%= pkg.name %>.Web/*.js',
            options: {
                vendor: ['<%= pkg.name %>.Web/Scripts/*.js', '<%= pkg.name %>.Web/lib/*.js'],
                host: 'http://127.0.0.1:<%= connect.test.port %>/',
                specs: '<%= pkg.name %>.Web/specs/*.js'
            }
        },
        connect: {
            test: {
                port: 8000,
                base: '.'
            }
        }
    });

    grunt.loadNpmTasks('grunt-contrib-jasmine');   
    grunt.loadNpmTasks('grunt-contrib-connect');   

    // Default task(s).
    grunt.registerTask('default', ['connect', 'jasmine']);
       
};

You can see that in the jasmine task, I use the port number of my connect task. In my default task, at the bottom of the file, I first fire up the connect port and once that one is running, I let grunt run my jasmine tests.

Once I now issue the grunt command at the command line,I can see it running my tests.

One step further: automated build


Running my jasmine tests locally this way, is cool by itself, but it would be even nicer if I could integrate this in some sort of automated build process. Ie. check-in my code, trigger the grunt task runner, which will run my tests, run jslint, run uglify, ... Basically, get a finished product at the end of the pipeline. 

The project I am working on right now, I got it using tfsservice, since I wanted to find out what its' pro's and cons are. This means, for automating my build, I had to rely on msbuild to do the trick for me. Now, tfsservice has got iisnode installed on it, so it should be possible to have it run grunt tasks as well. 

To get this working, I altered some things in my grunt setup. First of all, I reinstalled grunt and all the packages it uses, so that they got saved locally into my project. This means reissuing the npm install command for grunt, contrib-jasmine, ... but WITH the --save-dev option. This will create a packages folder inside your project with all necessary files for each plugin saved locally inside your project. Once you commit your project to your source control system, all packages will also be present locally on the build server and don't need to be installed globally on your build server (something you just cannot do on tfsservice, being, that you're not sure on which build server you will be running next, which means reinstalling all packages with every run, which is just time consuming. You just don't want to do that.). 

I additionally installed the grunt-cli package locally (so, again, with the --save-dev option). Grunt-cli is the grunt command line interface. It gives you the grunt command locally (read: on your build server). 

Once you have done this, you can alter your csproj file of the project you want to use grunt in (remember: I am working in a .Net context here). For this, I added an additional target at the end of my csproj file: 

  <Target Name="RunGrunt">
    <Exec ContinueOnError="false" WorkingDirectory="$(MSBuildThisFileDirectory)\.." Command="./node_modules/.bin/grunt --no-color" />
  </Target>

This target uses my locally installed version of grunt. The --no-color option I added to get the grunt output nicely formatted. If you don't add this option, your output will look pretty messy.

You will also need to tell your build process to also run grunt after your build. So also add:

<Project ToolsVersion="4.0" DefaultTargets="Build;RunGrunt" xmlns="http://schemas.microsoft.com/developer/msbuild/2003">

After these alterations, you will see your grunt output in the output window of Visual Studio after building your project. This should also make it possible to automatically run grunt on my tfsservice.

For this I made a build definition for my tfsservice. After checking in my code, the grunt task gets run as well, only, for now, it exits with errors (return fs.existsSync(filepath);
              ^
  TypeError: Object # has no method 'existsSync'). I looked in to these errors and apparently they are due to the fact that tfsservice doesn't use the latest version of node. I asked the tfs team if they could fix this and they promised me they'd get it done by the end of the month. So, for now, I'm still hoping to get this up and running in a couple of weeks. Normally, once node gets upgraded, there shouldn't be a problem. 


Friday, May 3, 2013

Testing an Aspnet MVC app with Ruby

Why testing through the UI is hard(ly done)


Writing UI tests for a web application can be quite cumbersome and is a painstakingly repetitive task. Also, the UI of an application tends to change often during development, making UI tests a brittle resource. To top this, when running UI tests, you need to count on a browser to act as a host for them, making them a lot slower than regular unit tests.

It is for these and other reasons that people often don't go through the trouble of writing UI tests. And they are, in my opinion, right to do so.

But still, I have seen a lot of applications break in the UI after making minor changes. If these errors don't pop up in your staging environment, you are left with a red face once you deploy to production (and yup, I have seen this happening too often, to not take steps to fix this). And no, people don't always go through the entire application when it's on the staging environment. The times where I've seen full test plan execution for an application, before it is allowed to go through to production, can be counted on (less than) one finger. The only fallback we have here are our unit tests and as the name says, they are for testing (small) units, not entire applications (read: end-to-end testing).

There are of course testing frameworks you can use to run your UI tests, Selenium being one of them. I have been using Selenium on a couple of projects, but often give up quickly because of the slowness of the tests, because tests are hard to maintain, ... and so on.

Now, I recently followed the Ruby and Rails for n00bs session of my good friend Michel (@michelgrootjans) and got introduced to a couple of Ruby test gems that actually open up a couple of opportunities you can use in your .NET applications as well.

In this blog post I want to give you an overview of how you can set these Ruby test gems up, so they can run UI tests for an ASP .NET MVC application (or any .NET web application that is). The technologies (and gems) I will be describing here are:
  • Ruby (of course)
  • RSpec
  • Capybara
  • Selenium
  • PhantomJS
  • Poltergeist 

Setting up the test environment


First of all, let's get our environment setup. For this, you will need Ruby, which you can find here. Once installed, you can test if all went well by running the following command from the command line:

irb

This should open up a Ruby REPL loop where you can test out statements (for instance 1+1, should give you the answer of 2).

Once this is setup. Exit the REPL loop and start installing all the necessary gems:

gem install rspec

gem install capybara
gem install selenium-webdriver
gem install poltergeist

One other thing we now need to install is PhantomJS, which you can find here and Firefox (which is used by the default selenium web driver, I will give you other options further down this blog post). And that's all we need to get started.

Writing a first test with rspec


We can now start writing tests. Our tests will be placed in separate _spec.rb files in a spec folder. For instance if you want to write specification tests for customers, you will have a customers_spec.rb file, for products, you will have a products_spec.rb file. Of course you are free to use whatever naming and grouping of your specification tests, just make sure you have a spec folder with in it at least one _spec file.

A spec looks like this:

describe 'adding a new customer' do
  it 'should be able to create a new customer' do

  end
end

As you can see, you start of with a describe, which tells what kind of behavior you want to test. The it part contains the expected outcome (we will add this later). Don't worry about the Ruby syntax for now. For people using a BDD-style testing framework the describe and it syntax should look familiar.

The things we will want to test, are going to be the behavior of a website. For this we will use the capybara and selenium gems. And since we want this first spec and all following specs to be using the same setup for our tests (eg. url of the site we will be testing), we will use a spec_helper.rb file for this. In this file we will require all the necessary gems and do all of the setup. Each individual spec file will then require this one spec_helper file:

require 'capybara/rspec'
require 'selenium/webdriver'

Capybara.run_server = false
Capybara.default_driver = :selenium
Capybara.app_host = 'http://localhost/TheApplication'

After the require statements, we configure capybara. First of all, we tell it to not run its server. Since capybara is essentially a rails testing framework, it runs under a rack application by default. We won't have this, since our app will be running in IIS (Express) or something similar. Next we tell it which driver to use and last where our application is located (you could test www.google.com if you'd like).

Now that we have this setup, we can start writing a first test. Capybara actually allows you to click buttons and fill out fields in a web application, and that's what we will be doing:

require 'spec_helper'

describe 'adding a new customer', :type => :feature do
  it 'should be able to create a new customer' do
    visit '/Customer'

    click_link 'Add'

    fill_in('first_name', :with => 'Gitte')
    fill_in('last_name', :with => 'Vermeiren')
    fill_in('email', :with => 'mie@hier.be')

    click_button 'Create'

    page.should have_text 'New customer created'
  end
end

As you can see, capybara has methods for clicking links, filling out fields, choosing options, ... and in the end for testing whether you get an expected outcome in your application. You can find the capybara documentation with additional capabilities here.

Also notice I added the :type => :feature hash to the describe, so the test will be picked up as an rspec test.

Once you have this spec file, you can actually run your test. For this fire up a command prompt, cd to the directory just above your spec directory and run the rspec command:

rspec

You will notice this command will take a bit to start up, but once it's running, it will start up a firefox window and show you an error in the command prompt, since I assume you don't have anything implemented yet to get the above test to succeed. I leave it up to you, the reader, to write a small web app to get this test passing. Once you have this and you run the rspec command, you will see the different fields in your browser filled out with the values you specified in your test.

Improving our test

Now, I promised you, the return on investment with rspec, capybara, ruby, ... would be worth the effort. First of all, I can tell you from experience that the above capybara test is a lot cleaner than comparable tests written in .NET. But above that, we can do more. 

We can start of by having our tests run headless, meaning that we won't be needing a browser window anymore. For this we will use poltergeist and phantomjs. You will need to alter the spec_helper file for this:

require 'capybara/rspec'
require 'selenium/webdriver'
require 'capybara/poltergeist'

Capybara.run_server = false
Capybara.default_driver = :selenium
Capybara.javascript_driver = :poltergeist
Capybara.app_host = 'http://localhost/TheApplication'

Capybara.register_driver :poltergeist do |app|
  Capybara::Poltergeist::Driver.new(app,
                                    :phantomjs => 'C:\\some_path\\phantomjs.exe')
end

This adds the extra requirement for poltergeist and adds the javascript_driver configuration setting. Additionally we tell capybara where it can find the phantomjs process.

You will also need to add the :js => true hash to your describe statement for it to run in phantomjs:

describe 'adding a new customer', :type => :feature, :js => true  do


If you run your tests now with rspec, you will notice, firefox will not run, you will just get a summary in the command prompt of which tests succeeded or failed.

I ran some tests with our own web application and noticed that the headless tests ran twice as fast as the tests using the browser.

Further improvements

I am actually already quite happy with this first test setup. It's still not the fastest running tests, but it does allow me to get in some easy end-to-end testing, or to even start doing some BDD style testing with this. You can also use cucumber if you'd want to to instead off rspec. 

In my own setup I extended the above example with some extra configuration settings to be able to easily switch my testing environment from my local to the staging environment and from headless to browser testing. 

I also did some tests with chrome (doable) and IE (very, very slow test runs!), but for now prefer the firefox and headless setup. 

I would also like to add some extra stuff to setup and clear my database before and after each test. That is something I haven't figured out yet, but should be easily added. 


Monday, February 11, 2013

A Better Dispatcher with the Factory Facility

In the applications we write, we often use the same principles. First off, there is dependency injection, preferably through the constructor of a class. Second we often use CQS, to get a clear separation between the commands and queries of our application.

For implementing CQS we often utilize some kind of a dispatcher. This is a simple class which has Dispatch methods for commands and queries. We can use it like so:

public class DoubleAddressController : Controller
{
    readonly IDispatcher _dispatcher;

    public DoubleAddressController(IDispatcher dispatcher)
    {
        _dispatcher = dispatcher;
    }

    public ActionResult GetExistingFilesForAddress(FindDoubleAddressRequest request)
    {
        var result = _dispatcher.DispatchQuery<FindDoubleAddressRequest, FindDoubleAddressResponse>(request);
        return PartialView(result);
    }
}


We ask the dispatcher to dispatch a query for a certain request and response. I ommitted error handling and additional mapping from the above example.

So, the dispatcher gets a certain command or query as an argument and based on this needs to ask a certain query or commandhandler to handle this command or query. Up untill now I used the IoC repository to get hold of this queryhandler:

public class Dispatcher : IDispatcher
{
    readonly IWindsorContainer _windsorContainer;

    public Dispatcher(IWindsorContainer windsorContainer)
    {
        _windsorContainer = windsorContainer;
    }

    public TResponse DispatchQuery<TRequest, TResponse>(TRequest request)
    {
        var handler = _windsorContainer.Resolve<IQueryHandler<TRequest, TResponse>>();

        if (handler == null)
            throw new ArgumentException(string.Format("No handler found for handling {0} and {1}", typeof(TRequest).Name, typeof(TResponse).Name));

        try
        {
            return handler.Handle(request);
        }
        finally
        {
            _windsorContainer.Release(handler);
        }
    }
}

The dispatcher has a dependency on our IoC container, in the example above a WindsorContainer, and asks this container to get hold of the specific handler that can handle the request we just got in.

With this solution however there are a couple of problems. First of all, we need a dependency on our IoC container (in the IoC configuration we configure the container with a reference to itself). Second, we resolve a dependency from the container, which is just not done (service location is known as an anti-pattern). And we need to think about releasing the handler dependency we just resolved. Something the developer needs to think about and which I've seen forgotten.

So, there should be a better solution for this, and there is! I recently started a refactor on another piece of code which used a factory to get hold of instances and which did not make use of our Castle Windsor container. I started looking at the Castle Windsor documentation and you can actually configure it with classes which act as factory and with a factory facility. After this refactoring I thought this factory facility might as well be usable for our not so ideal dispatcher.

First we got rid of the WindsorContainer dependency in the dispatcher:

public class Dispatcher : IDispatcher
{
    private readonly IFindHandlersFactory _handlerFactory;

    public Dispatcher(IFindHandlersFactory handlerFactory)
    {
        _handlerFactory = handlerFactory;
    }

    public TResult Dispatch<TRequest, TResult>(TRequest request)
    {
        var handler = _handlerFactory.CreateFor<TRequest, TResult>(request);
        if (handler == null)
            throw new HandlerNotFoundException(typeof(IQueryHandler<TRequest, TResult>));
        
        return handler.Handle(request);
    }
}


We now use a IFindHandlersFactory. A factory which just finds handlers for us. This interface just has one method defined, CreateFor, with generic type parameters. The thing is that we will not make an implementation for this interface. This interface will be configured in our Castle Windsor container as a factory.


container.AddFacility<typedfactoryfacility>();

container
    .Register(
        Component
            .For<IDispatcher>()
            .ImplementedBy<Dispatcher>()
            .LifestyleTransient())
    .Register(
        Component
            .For<IHandlerFactory>()
            .AsFactory()
            .LifestyleTransient())
    ;

Once you have done this, Castle Windsor will automatically resolve your handlers, without you having to actually call Resolve for these dependencies.

Thursday, November 1, 2012

Unit Testing a Windows 8 Application

I am a big fan of test driving an application. That's why I write almost no code without writing a test for it.

I recently began writing a Windows Store application for Windows 8 and again wanted to test drive this app.   If you look at MSDN at how to add a test project to you Windows 8 app, you will see, you can add a Windows Store test project to your solution. Now, handy as this is, the down sight is that this test project is as well a Windows Store project type, meaning you won't be able to add a whole bunch of references to it. I wasn't able to add RhinoMock or Moq to it, nor was I able to add MSpec. The problem being these frameworks were build to the wrong version of the .Net framework.

Now, I could have made my own builds of the frameworks I am happy working with, but I started looking if there is no other way, like using a simple class library for unit testing a Windows Store app. Now, when you try this, the problem is, you can't get a reference of your Windows Store app added to your class library for testing.

To get this fixed, I tried out a couple of things. First I tried adding the same references to my class library project as were in the Unit Test Library for Windows Store apps. This didn't work, however. Also, I couldn't find the '.NET for Windows Store apps' reference dll. I also tried playing around with the output type of my project. Changing it to something different than class library. But then again, adding the necessary unit testing references became a problem. I also played around with the conditional compilation symbols (hey, I was trying to find where the differences lay between my own class library and a Unit Test Library for Windows Store apps).

After trying all that, I unloaded my project from solution explorer and started editing it, comparing it to the Unit Test Library for Windows Store apps and trying out different combinations. Now, after a couple of tries, the setting in your project file, you need is the following:

<Import Project="$(MSBuildExtensionsPath)\Microsoft\WindowsXaml\v$(VisualStudioVersion)\Microsoft.Windows.UI.Xaml.CSharp.targets" />

You can put this line as a replacement of the other csharp.targets file at the bottom of your project file. Once you have added this, you can add a reference of your Windows Store app to your class library. You will even see the '.NET for Windows Store apps' reference show up in your references. You will even be able to add all the additional references you want, like NUnit, Moq or RhinoMock, ...

One additional problem I had was with the System.Data dll, which was build to a different framework. Since I didn't need it in my test project, I happily removed it.


Monday, September 3, 2012

WCF on IIS and Windows 8

Just spend some time getting a simple WCF service up and running under IIS on my Windows 8 machine. Apparently, if you install IIS after installing the last .NET framework (ie. installing Visual Studio 2012), not all necessary handlers, adapters and protocols for WCF are installed on your IIS.

First time I tried to reach the WCF service it gave me an error that said 'The page you are requesting cannot be served because of the extension configuration.' This means you need to run Servicemodelreg.exe to reregister WCF (same kind of registration you needed from time to time for ASP .NET on previous versions of IIS, remember aspnet_regiis). You can find this tool at C:\Windows\Microsoft.NET\Framework\v3.0\Windows Communication Foundation for version 3.0 or at C:\Windows\Microsoft.NET\Framework\v4.0.30319 for version 4.0.

Now looking at the MSDN site, they will tell you to run the 3.0 version. After doing so, however, you won't have the necessary handlers installed for a WCF service created with Visual Studio 2012, since they are all version 4.0. So that won't work.

Running the 4.0 version however won't work either. If you try Servicemodelreg.exe -i it will tell you to register with the -c option (register a component). If you try the -i -c option you will get the error (and the solution!) that this tool cannot be used on this version of windows. What you can use, though, is the 'Turn Windows Features On/Off' dialog.

So simply open this up from your control panel (I pinned my control panel to my start page on day one of installing Windows 8, otherwise I wouldn't be able to find it again) and check the necessary WCF features you want to have available on your WCF. In most cases, just flagging HTTP will do. You can find the WCF features under .NET Framework 4.5 Advanced Services.


And that's what you need to get yuor WCF service running under IIS on Windows 8. Hope this was helpful.

Addendum: This fix recently also solved the issue of a 'HTTP Error 400. The request hostname is invalid' error of a colleague when trying to run a WCF service on Windows 8.

Saturday, July 14, 2012

Knockout an MVC Ajax call

I recently needed to build an Ajax data search, showing the result of the search in an MVC web page. Great opportunity, I thought, to give Knockout.js a try. Knockout.js lets you apply databindings to a web page and for this it uses an MVVM (Model View ViewModel) approach.

On the knockout site, you can find some great examples to get started, even give it a try in jsFiddle. But since my solution is a bit different from their tutorials, I wanted to share it with you.

The actual problem at hand was a page on which I needed to link a scanned in document to a dossier. Most of the times the number of the dossier can be picked up from the scanned in document, but this is not always the case. In case where the number of the dossier can't be determined from the scan, we want our users to go look for the dossier and link the dossier manually to the scanned in document.


The page to do this more or less looks like this (I rebuild the solution without most of the formatting we have in the initial application).


The initial setup for this contains a ScanController that gives you this Scan Detail page.

public class ScanController : Controller
{
        public ActionResult Detail(int id)
        {
            var scan = new Scan
                        {
                            Id = id,
                            File = "This is the file",
                            DossierId = 0,
                            DossierNumber = string.Empty
                        };
            return View(new ScanViewModel(scan, new Dossier()));
        }
}

This uses the Detail view, which consists of two divs for the accordion. The top div looks like this:

@using (Html.BeginForm("Link", "Scan"))
{
  &lt;div>
    &lt;fieldset>
      &lt;dl>
        &lt;h2>Scan info&lt;/h2>
        @Html.Label("Receipt date") 
        @Html.TextBox("receiptdate", string.Empty, new { @class = "date"  })                
      &lt;/dl>
      &lt;h2>Dossier info&lt;/h2>
      &lt;div>
        @Html.Hidden("file", Model.Scan.File)

        &lt;div id="linkDiv" @(Model.Scan.DossierId == 0 ? "class=hidden" : "")>
          &lt;div>Dossier: &lt;span id="dossierNumberText">@Model.Scan.DossierNumber&lt;/span>&lt;/div>
          @Html.Hidden("dossierNumber", Model.Scan.DossierNumber)
          &lt;input type="submit" value="Link Scan to this dossier"/>
        &lt;/div>
        &lt;div id="message" @(Model.Scan.DossierId == 0 ? "": "class=hidden")>
          There is no dossier to link to. You should search for one.
        &lt;/div>
      &lt;/div>
  &lt;/fieldset>
  &lt;/div>      
}

The bottom div looks like this:


&lt;div id="search">
    @using(Html.BeginForm("Search", "Dossier", FormMethod.Post, new { @id = "dossierForm" }))
    {
        &lt;fieldset>
            &lt;dl>
                @Html.LabelFor(m => m.Dossier.DossierNumber) 
                @Html.TextBoxFor(m => m.Dossier.DossierNumber)
            &lt;/dl>
            &lt;dl>
                @Html.LabelFor(m => m.Dossier.OwnerLastName) 
                @Html.TextBoxFor(m => m.Dossier.OwnerLastName)
            &lt;/dl>
            &lt;dl>
                @Html.LabelFor(m => m.Dossier.OwnerFirstName) 
                @Html.TextBoxFor(m => m.Dossier.OwnerFirstName)
            &lt;/dl>
            &lt;dl>
                &lt;input type="submit" value="Search"/>
            &lt;/dl>
        &lt;/fieldset>
    }
&lt;/div>
&lt;div id="searchResult" class="hidden">
    &lt;table id="resultTable">
        &lt;thead>
            &lt;th>DossierNumber&lt;/th>
            &lt;th>OwnerLastName&lt;/th>
            &lt;th>OwnerFirstName&lt;/th>
            &lt;th>Detail&lt;/th>
            &lt;th>Link&lt;/th>
        &lt;/thead>
        &lt;tbody>
                    
        &lt;/tbody>
    &lt;/table>
&lt;/div>

It's this bottom div that we are most interested in. The top form (Search Dossier) will be used to perform an Ajax search. The result of this search will have to be shown in the table of the bottom searchResult div.

For this search I already added a Dossier controller with a Search action:

public class DossierController : Controller
{
  public ActionResult Search(DossierSearchViewModel searchVm)
  {
    return Json(new
                  {
                    Success = true,
                    Message = "All's ok",
                    Data = new List&lt;Dossier>
                            {
                              new Dossier
                                  {
                                    DossierNumber = "123abc",
                                    OwnerFirstName = "John",
                                    OwnerLastName = "Doe"
                                   },
                              new Dossier
                                  {
                                    DossierNumber = "456def",
                                    OwnerFirstName = "Jeff",
                                    OwnerLastName = "Smith"
                                  },
                              new Dossier
                                  {
                                    DossierNumber = "789ghi",
                                    OwnerFirstName = "Peter",
                                    OwnerLastName = "Jackson"
                                  },
                              new Dossier
                                  {
                                    DossierNumber = "321jkl",
                                    OwnerFirstName = "Carl",
                                    OwnerLastName = "Turner"
                                  },
                             }
                   });
  }
}

If you click the Search button you will be get to see the Json result in the Dossier/Search page. This is not what we want, this form should perform an asynchronous Ajax post. That's not yet the case. For this I used the JQuery forms plugin. Which has a handy ajaxForm method you can add to your form. (you could also use the mvc ajax extensions for this, they should already be in your initial MVC setup).

&lt;script type="text/javascript">
    $(function () {
        $("#dossierForm").ajaxForm({
            success: render_dossier_grid
        });
    });

    function render_dossier_grid(ctx) {
    }
&lt;/script>

All of the knockout magic can now be added in the render_dossier_grid function. Before we can do this, make sure to add the knockout.js files to your solution. This can be easily done using nuget. Reference them in your _layout file, so you can use them.

First, let's create a viewmodel. This will be nothing more than a list of dossiers we get back from our dossier search. Since we want to be able to add and remove items from this list and at the same time have our table automatically show the new items, we will use a knockout observable array. To have the databindings applied to your view, you should call applyBindings for your viewmodel.

$(function () {
    $("#dossierForm").ajaxForm({
        success: render_dossier_grid
    });

    ko.applyBindings(viewModel);
});

function render_dossier_grid(ctx) {
}

var viewModel = {
    dossiers: ko.observableArray([])
};

This viewModel can now be filled when we get the result of our Ajax call.

function render_dossier_grid(ctx) {
    $("#searchResult").removeClass("hidden");
    viewModel.dossiers.removeAll();
    viewModel.dossiers(ctx.Data);
    myAccordion.accordion("resize");
}

That's pretty easy. I just reset the dossiers observable array of the viewmodel and add the dossiers that come from the Ajax call. Last bit is having the JQuery accordion control perform a resize, just to get rid of any scroll bars.

Next step is actually binding this viewmodel to something. So, we need to specify in our view what data needs to go where. For this we will extend the table we have on our page.

&lt;table id="resultTable">
    &lt;thead>
        &lt;th>DossierNumber&lt;/th>
        &lt;th>OwnerLastName&lt;/th>
        &lt;th>OwnerFirstName&lt;/th>
        &lt;th>Detail&lt;/th>
        &lt;th>Link&lt;/th>
    &lt;/thead>
    &lt;tbody data-bind="foreach:dossiers">
        &lt;tr>
            &lt;td data-bind="text:DossierNumber">&lt;/td>
            &lt;td data-bind="text:OwnerLastName">&lt;/td>
            &lt;td data-bind="text:OwnerFirstName">&lt;/td>
            &lt;td>
                &lt;a data-bind="attr: {href: DetailLink}">Detail&lt;/a>
            &lt;/td>
            &lt;td>
                &lt;a href="#" data-bind="click: $parent.useDossier">Use this file for linking&lt;/a>
            &lt;/td>
        &lt;/tr>
    &lt;/tbody>
&lt;/table>

Adding the databindings is not that hard. I added a foreach binding, which will make a new table row for each dossier in the dossiers observable array. Each table row has its own binding for each td element. The first three are quite obvious. You can databind to the names of the properties of your domain (or MVC viewmodel) object.

For the second to last binding I added a databinding to the href attribute of an a tag. The DetailLink is a property on the Dossier domain object that gives you a link to Dossier/Detail/id.

The last one is a special binding to the click event of an a tag. It is bound to the useDossier function of the parent of the binding. The parent of our binding is the actual viewmodel. We still need to add this useDossier function:

var viewModel = {
    dossiers: ko.observableArray([]),

    useDossier: function (dossierVM) {
        var dossierNumber = dossierVM.DossierNumber;
        myAccordion.accordion({ active: 0 });
        $("#dossierNumber").val(dossierNumber);
        $("#dossierNumberText").text(dossierNumber);

        $("#linkDiv").removeClass('hidden');
        $("#message").addClass('hidden');
    }
};

In this function I use the viewmodel. In this case this is the actual row/dossier of the table. I take the DossierNumber of the current dossier and use it to set the value of the dossierNumber and dossierNumberText fields in the top piece of the accordion. I also do some extra bits to update the UI accordingly.

That's it, not much to it. I really like this knockout framework. I did have some trouble to get started at first, but once you know your way around the viewmodel, it's pretty easy to use.

The full code can be found on github.